Integrations
WordPress plugin in 5 steps
Install IperChat on WordPress without touching code: search for the plugin, activate it, paste the Tenant ID, reload.
For WordPress there’s an official plugin (version 1.1.0, compatible with WordPress 5.8+ and tested up to 6.9; requires PHP 7.4+). It does two things:
- Loads the widget script in
wp_footer()on every page. - Exposes an
[iperchat]shortcode for inline embedding.
Nothing magical: the plugin is essentially the standard HTML snippet, managed from the admin panel instead of from the theme’s <body>.
Before you start
1. Find and install the plugin
Log into your WordPress (yoursite.com/wp-admin).
- Side menu → Plugins → Add new plugin.
- In the search box at the top right, type “IperChat”.
- The plugin appears among the top results. Author:
francescoipercontent. Orange icon with a speech bubble.
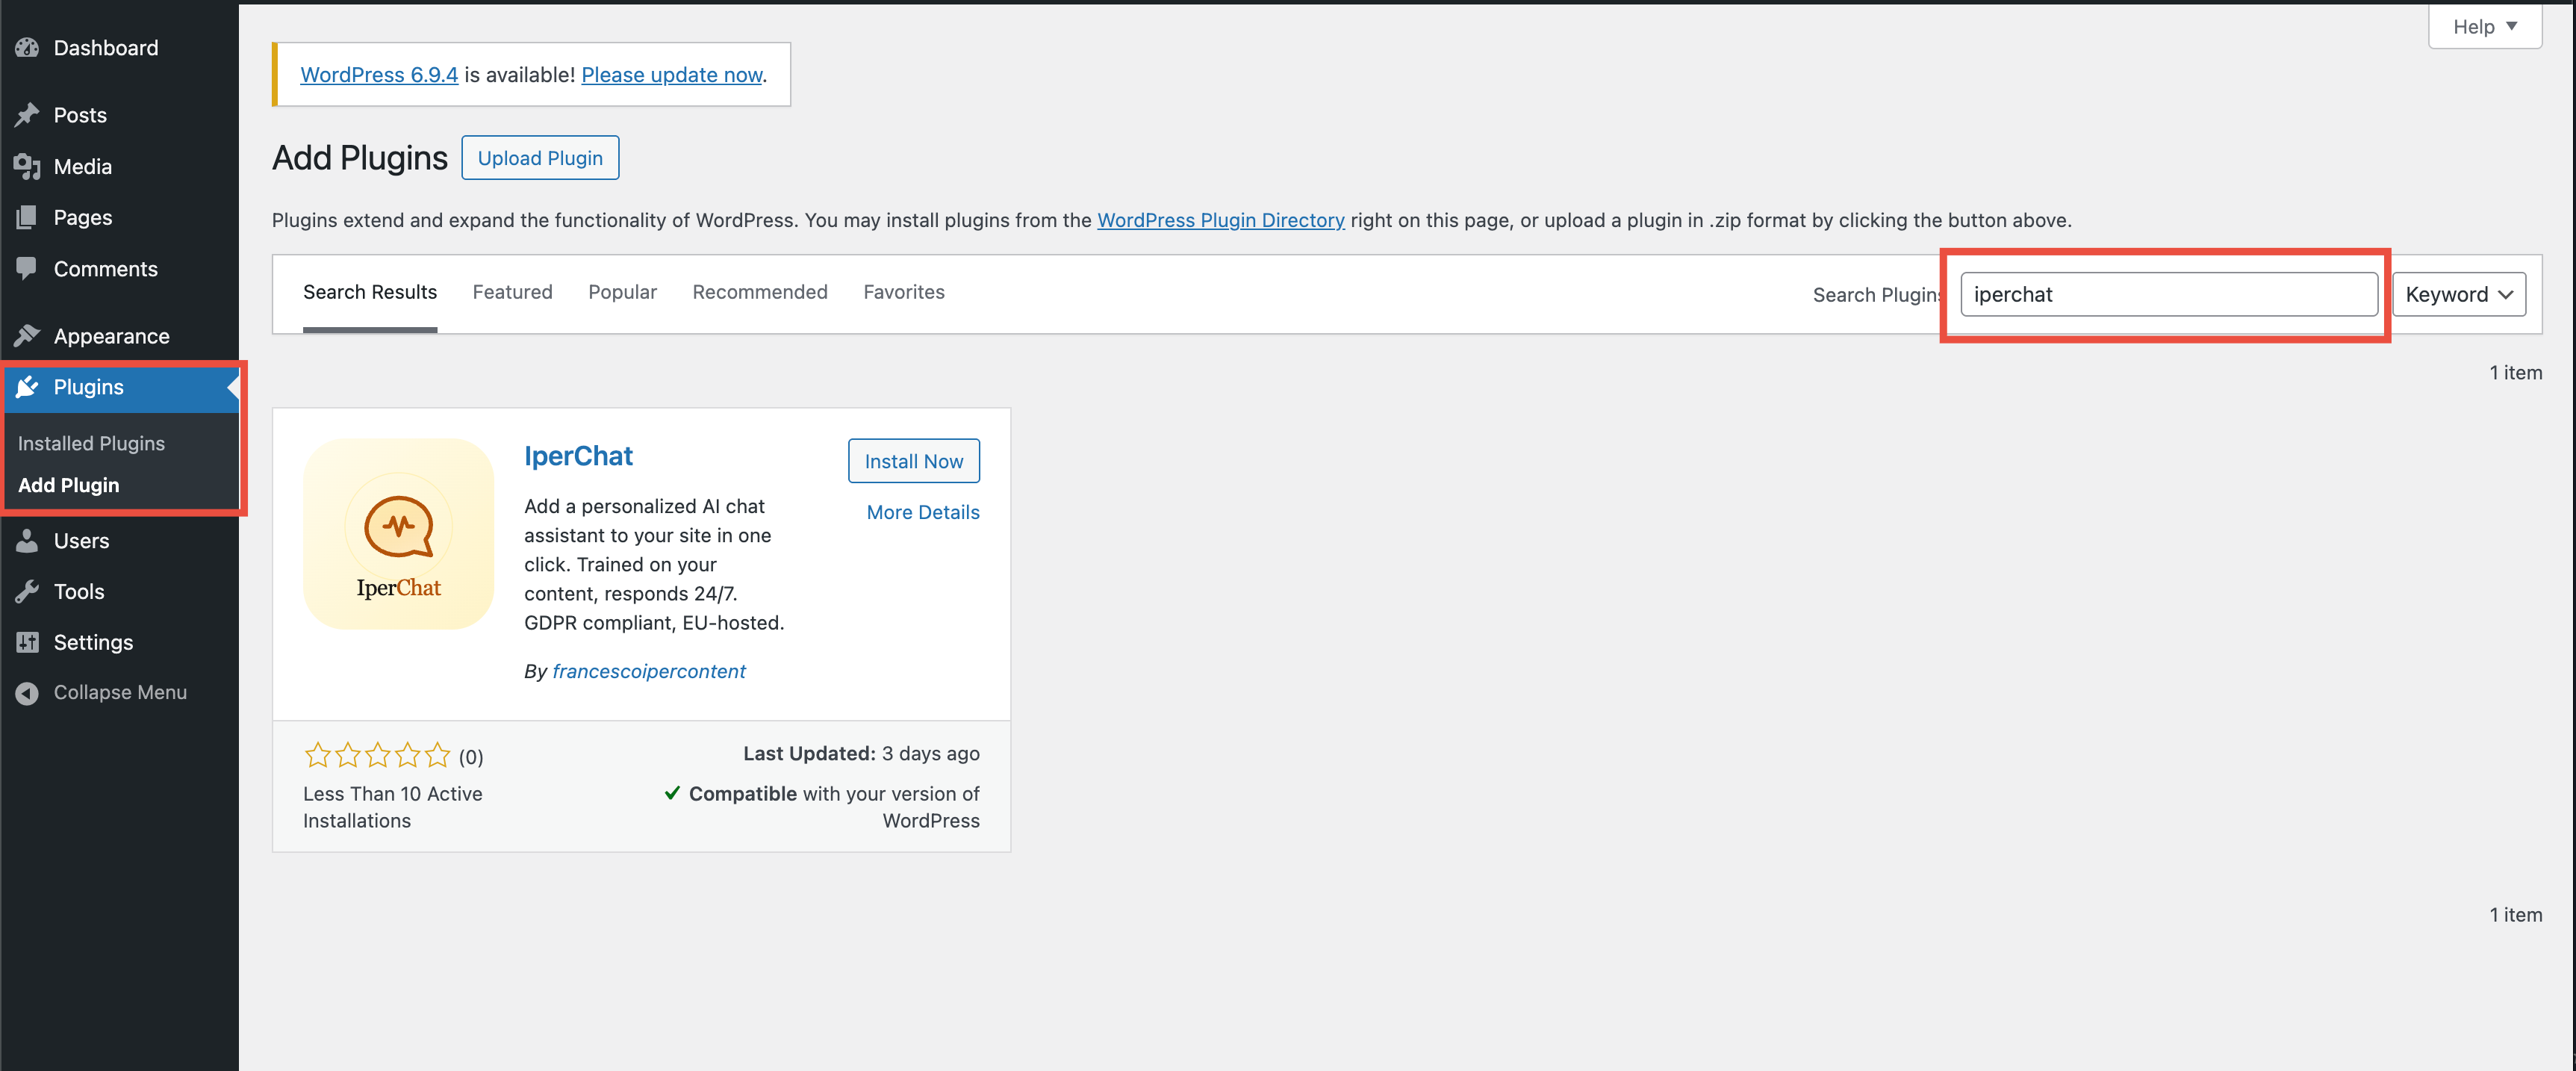
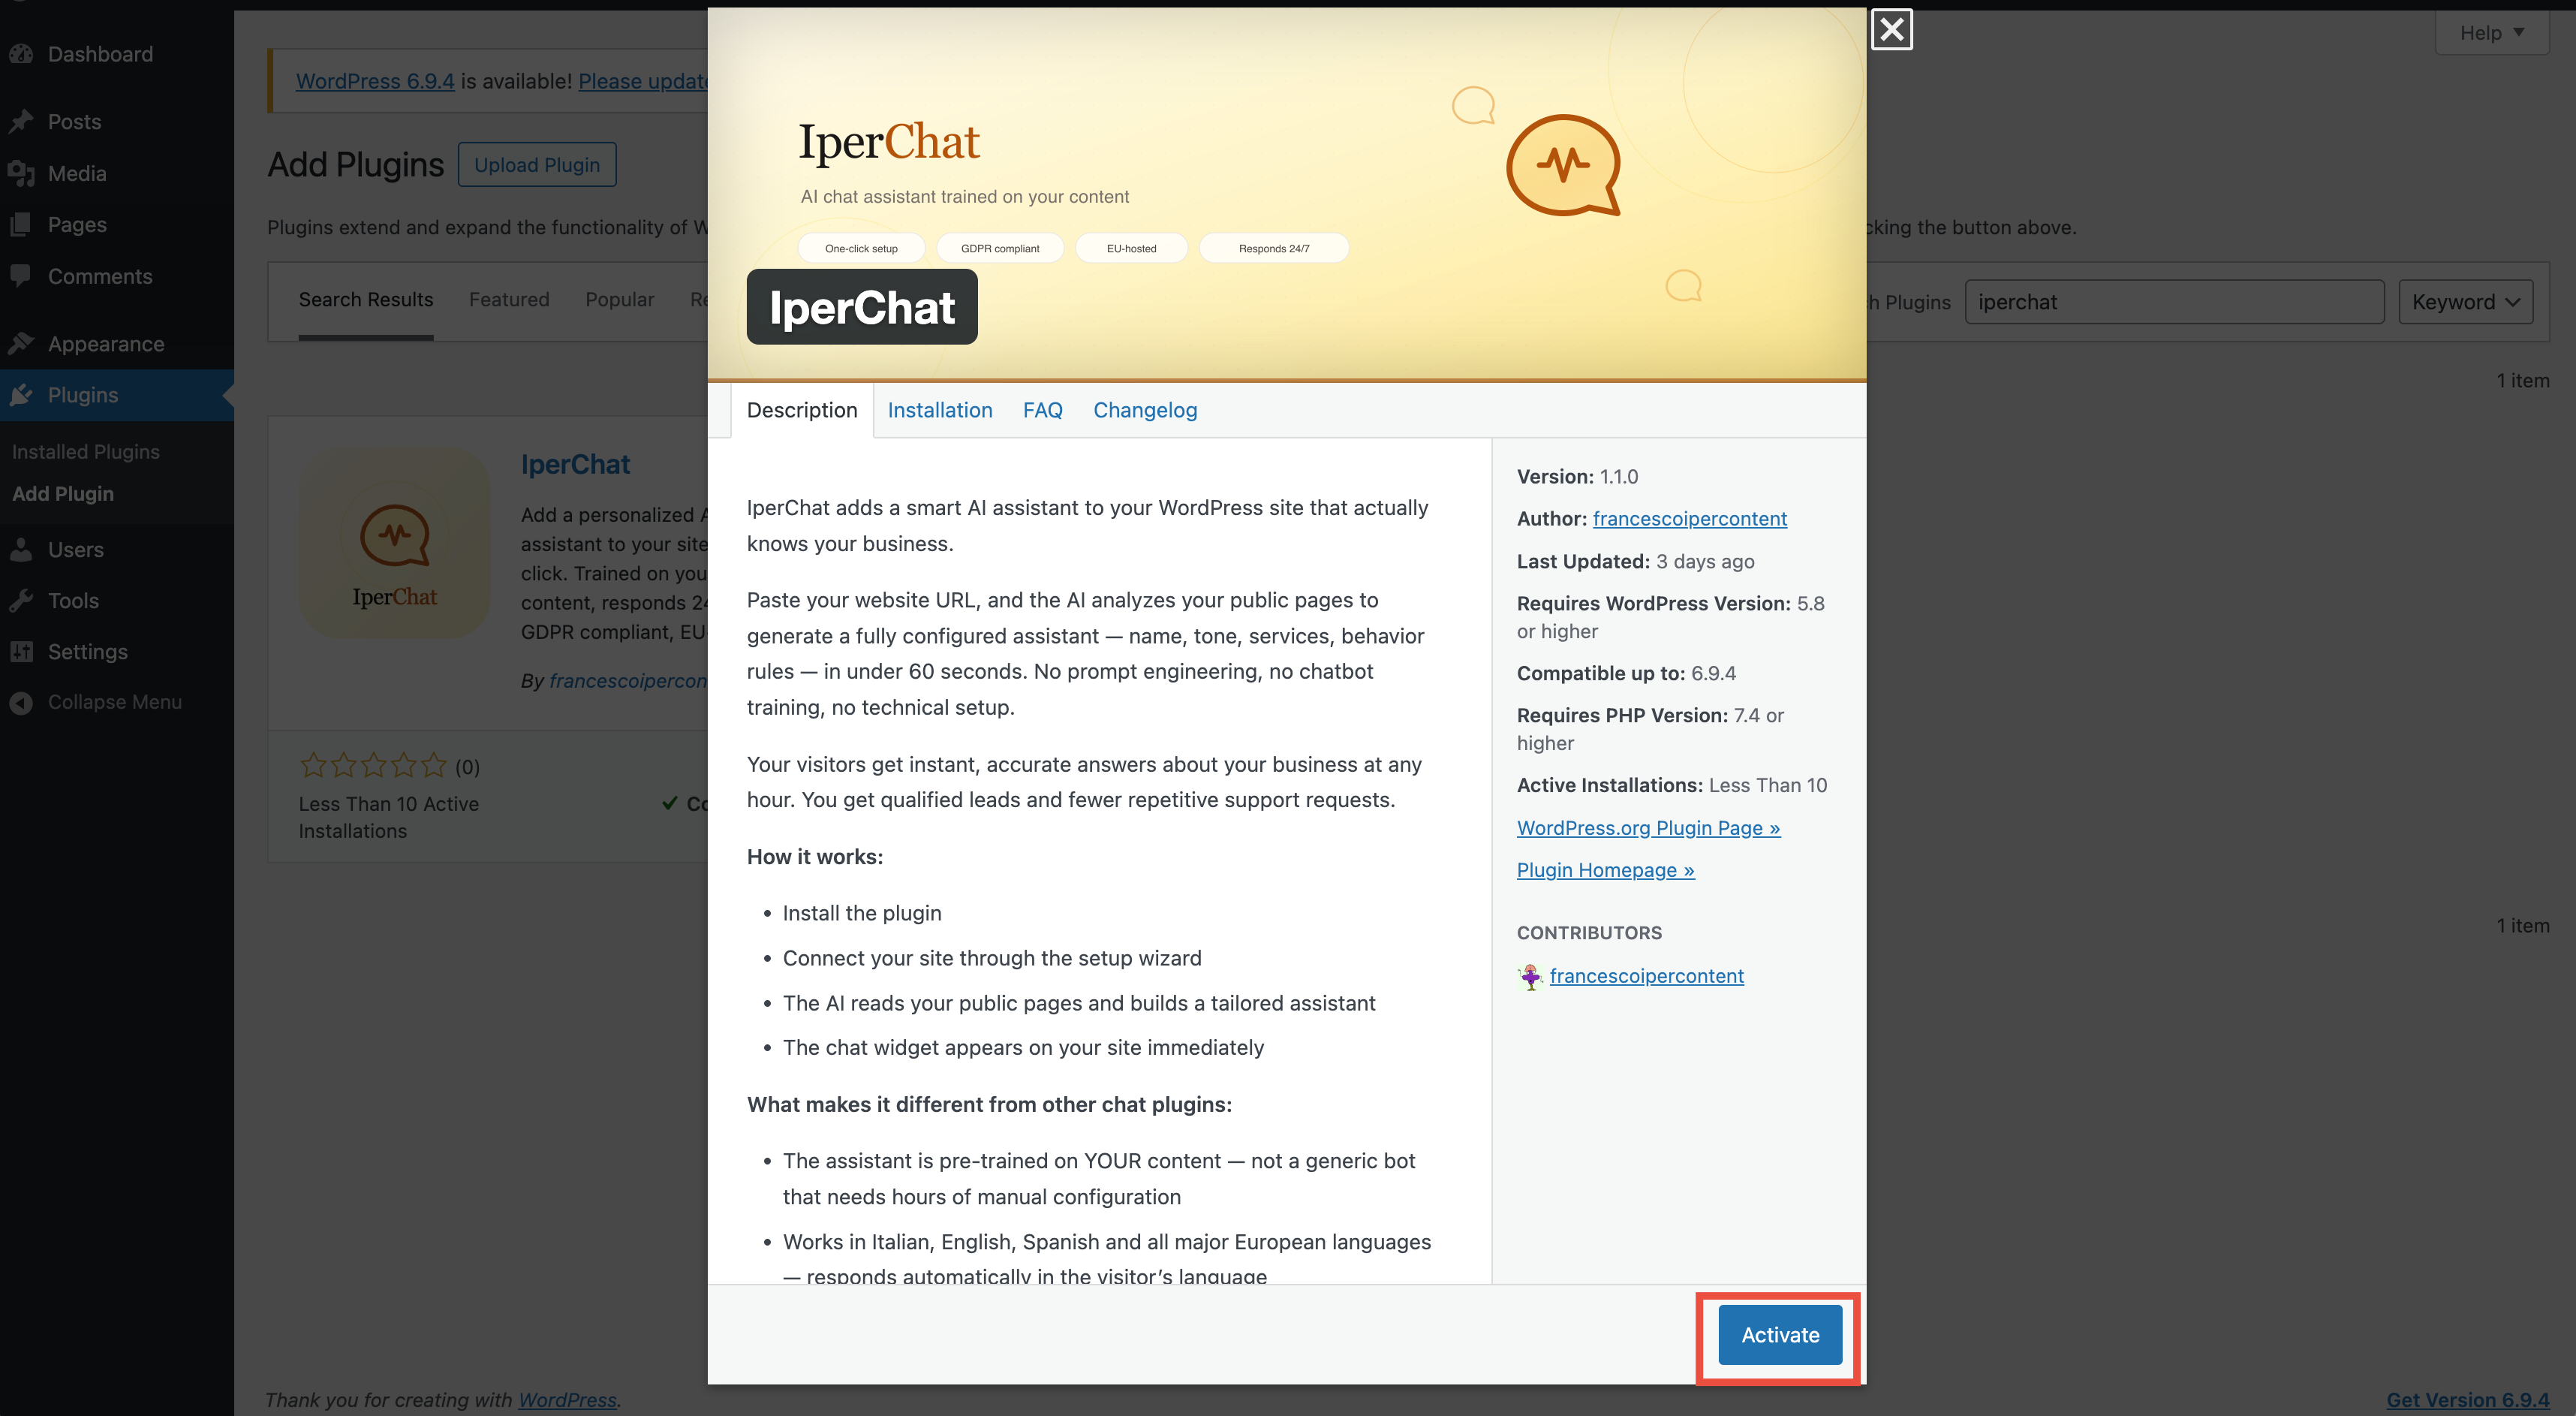
- Click Install now. When the button changes to Activate, click it.
2. Get your Tenant ID
The Tenant ID is the unique identifier of your IperChat space. It connects the widget on your site to your agent’s configuration (colors, behavior, knowledge base).
There are two paths.
A — You already have an IperChat account
- Go to admin.iperchat.ai.
- Open “My Tenant” (Manage group in the side menu).
- The Tenant ID is the monospace string under the page title: copy it from there. Alternatively, open “Documentation” (Agents group): the snippet shown already has the Tenant ID inside
data-tenant-id.

B — You don’t have an account yet
- In WordPress, go to Settings → IperChat.
- Click “Link your site”.
- The IperChat demo opens with your site URL already filled in.
- Complete the free analysis, register an account, pick a plan.
- The final onboarding screen shows the ready snippet with the Tenant ID inside the
data-tenant-idattribute. Copy it from there.

3. Paste the Tenant ID and save
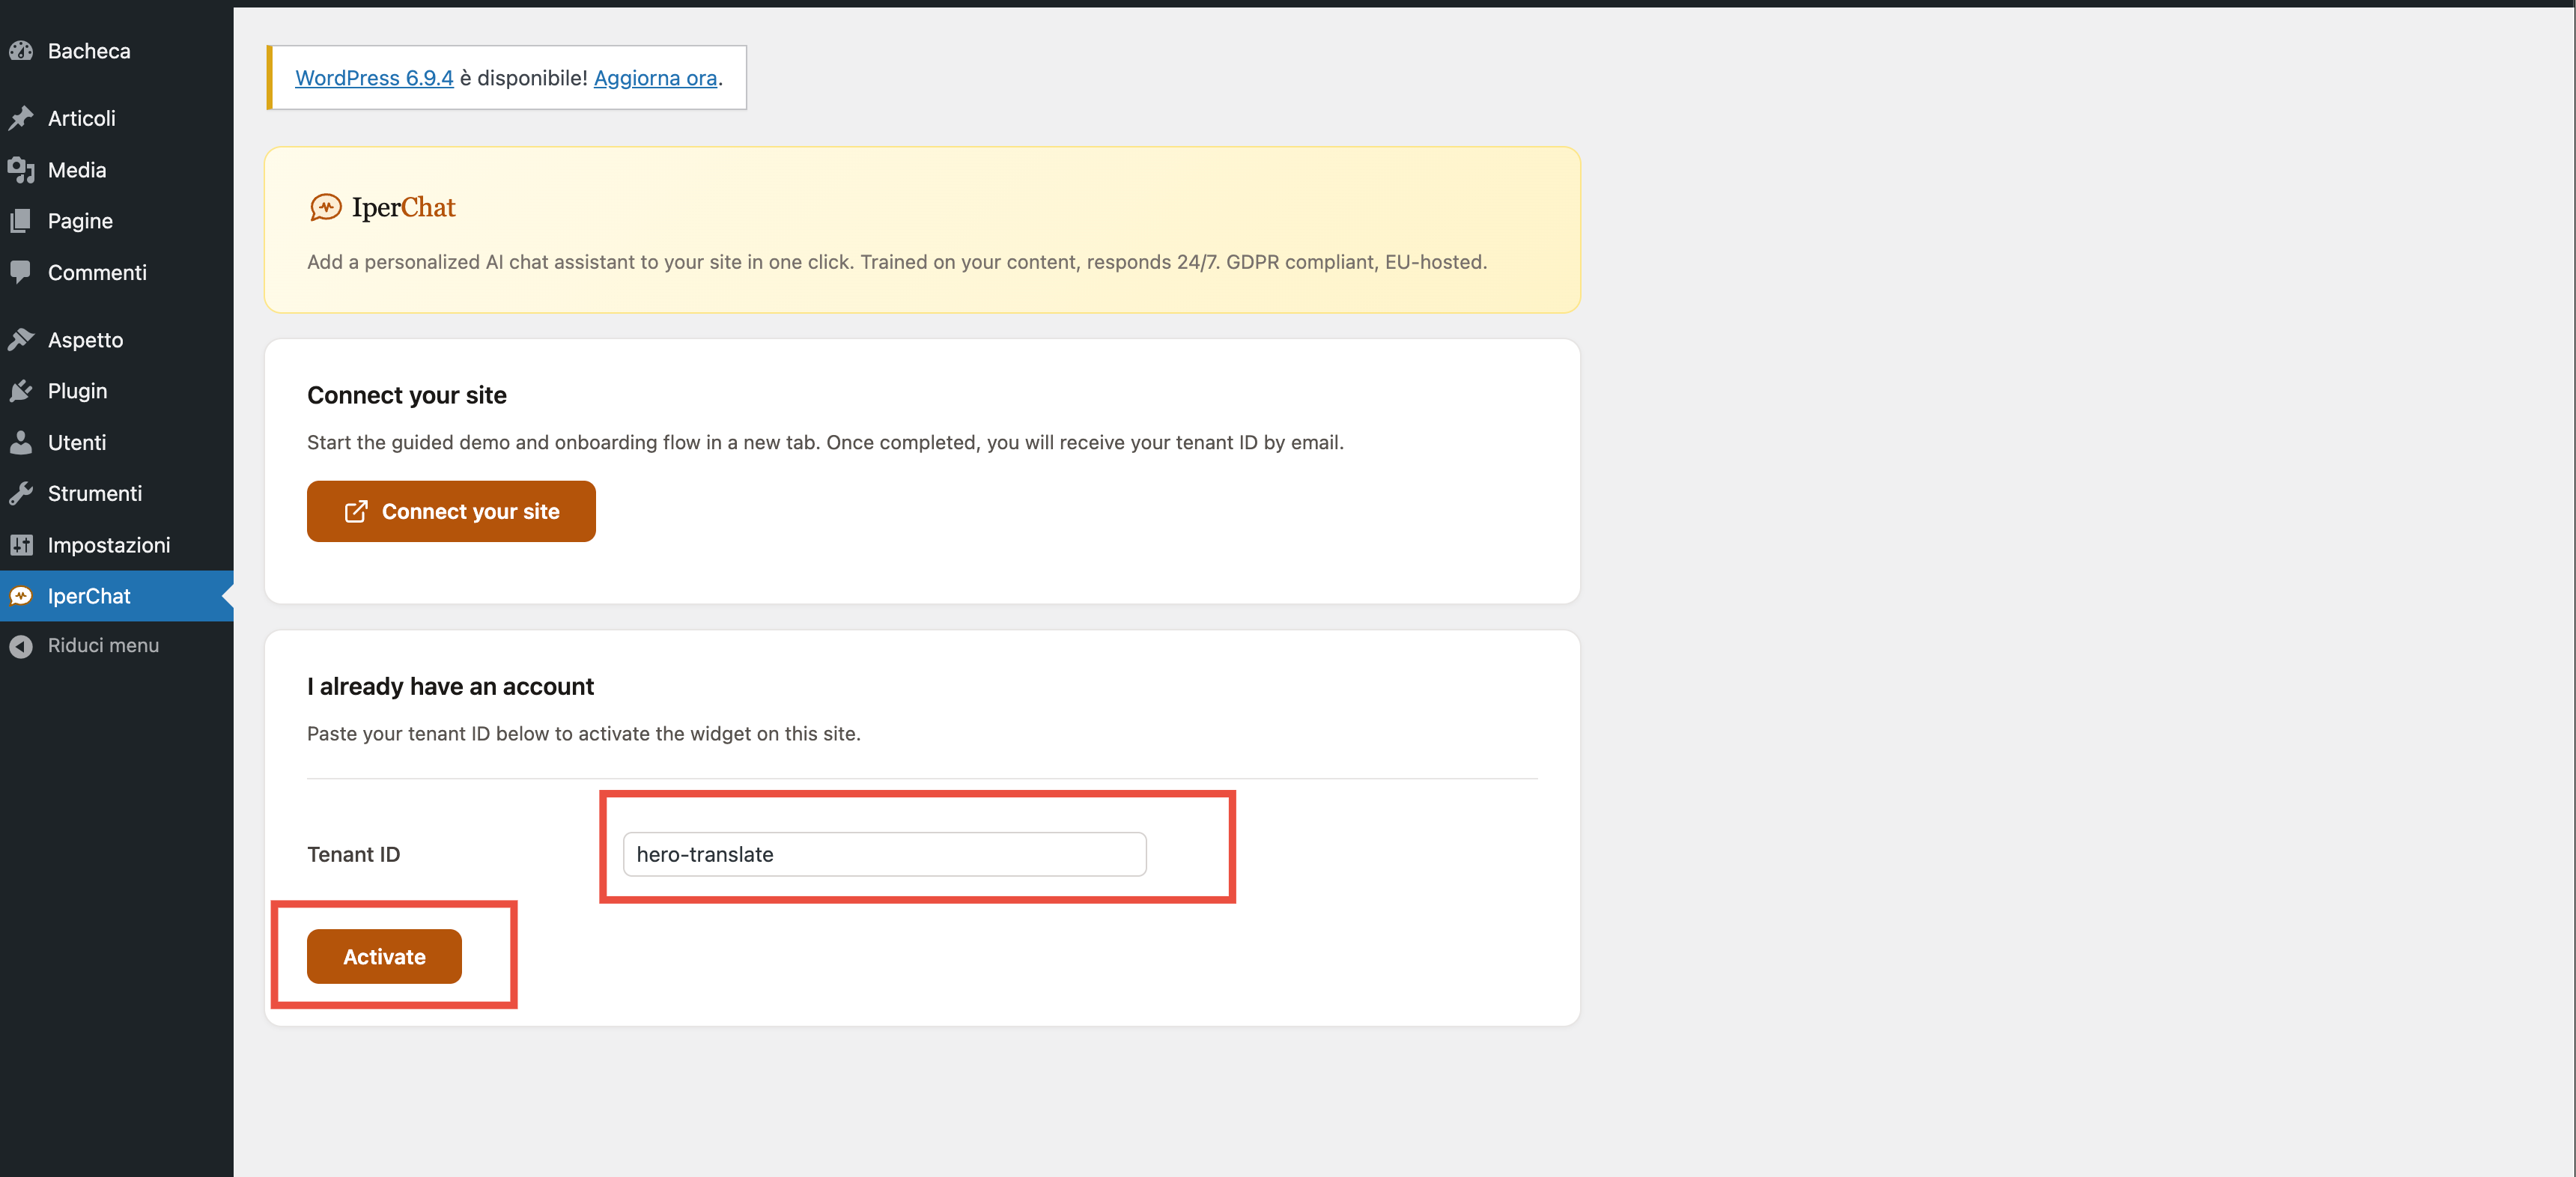
Back to WordPress.
- Settings → IperChat.
- In the Tenant ID field, paste the value and click Activate in the “I already have an account” section.
- After activation the plugin shows the Widget settings panel. You can customize:
- Position — Bottom right (default), Bottom left, or Inline (embedded in page).
- Language — Automatic (browser language) or forced to Italian / English / Spanish.
- Origin site (optional) — to apply per-page configurations from the ops panel.
- Under Advanced settings you’ll find the Container ID (used in Inline mode) and the Auto-initialize toggle.
- Click Save changes.
The plugin runs a domain check (see step 5).
4. Verify the widget on the site
- Open the home of your site in a new tab.
- Reload (
Ctrl+R/Cmd+R). - After a few seconds, the chat button should appear in the chosen corner.
- Click it, ask a question, verify the response.
5. Authorize the domain (if needed)
If you see a warning like “unauthorized domain” in the console, or the agent doesn’t respond, it’s because your WordPress domain isn’t yet in the tenant’s authorized list. Note: the plugin runs a check on save, so it may show you the warning directly in the settings.
To authorize it:
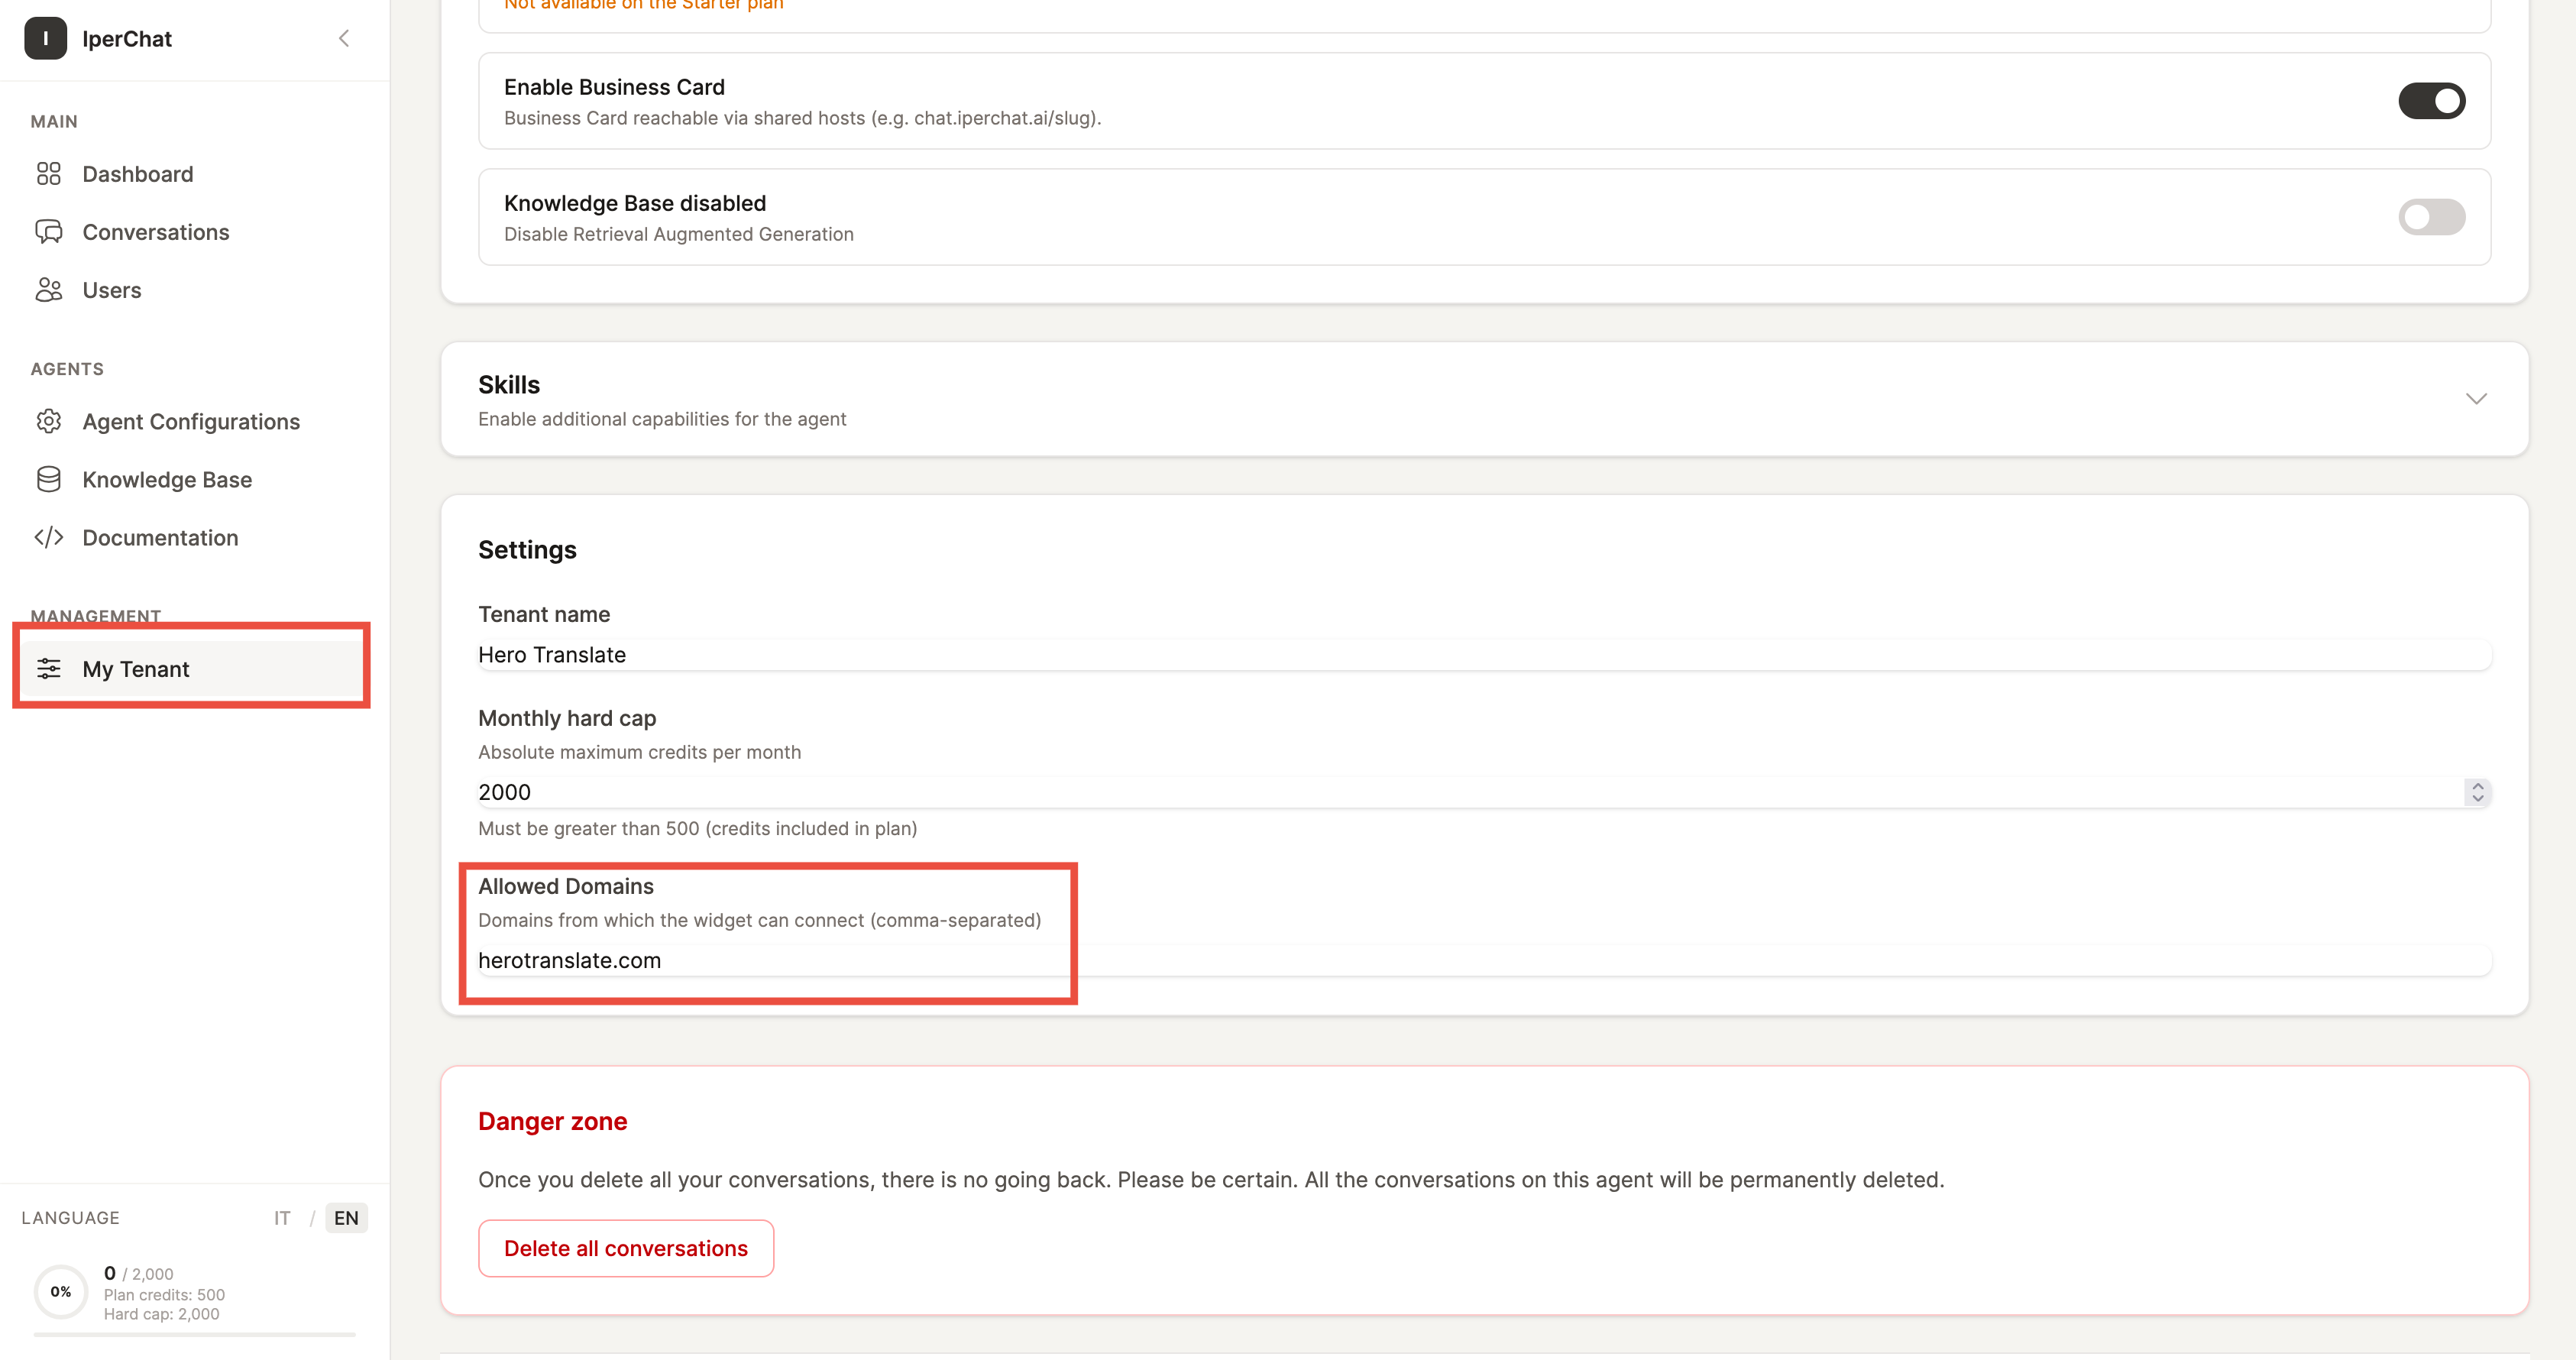
- admin.iperchat.ai → “My Tenant” (Manage group).
- Under Settings add the exact domain (e.g.
www.yoursite.com) to the Allowed domains field (comma-separated list). - Save, reload the WordPress site: the widget appears.
[iperchat] shortcode for inline embedding
If you set Position = Inline (embedded in page) in the plugin settings, the widget no longer appears as a floating button. You insert it wherever you want via shortcode:
| Shortcode | Effect |
|---|---|
[iperchat] | Standard embed at default height |
[iperchat height="500px"] | Custom height |
[iperchat id="my-chat"] | Custom HTML container ID (useful for custom CSS) |
The shortcode works in pages, posts, and the main page builders (Elementor, WPBakery, Divi, Gutenberg with the “Shortcode” block).
Troubleshooting
The widget doesn’t appear
Five checks in order:
- Tenant ID pasted without leading/trailing spaces and saved.
- Domain authorized in the ops panel (see step 5 — My Tenant → Allowed domains).
- Caching or CDN plugin — purge after saving.
- Defer JS or minification plugins — exclude
iperchat.iife.js. - Custom theme — check that
wp_footer()is infooter.php.
”The shortcode shows only the text”
- Is the page rendered as plain HTML? Some page builders ignore shortcodes.
- Is the position set to Inline (embedded in page)?
- In Gutenberg, use the Shortcode block.
- In Elementor / Divi / WPBakery, use the dedicated Shortcode element.
”Conflict with another chat plugin”
If you already have Tidio, Crisp, or Intercom active, the widgets overlap. Options:
- Change IperChat’s position (e.g.
bottom-left). - Deactivate the other plugin during testing.
”I don’t see the changes after saving”
- Purge the site cache (caching plugin + CDN).
Ctrl+Shift+R/Cmd+Shift+Rto force a browser refresh.- Important: widget configuration (colors, greetings, behavior) is not set from the plugin, but from the ops panel. The plugin only carries Tenant ID, position, and language.
Developer filters
If you need to point the plugin at a staging environment, there are three WordPress filters for functions.php:
add_filter('iperchat_widget_url', function() {
  return 'https://widget-staging.iperchat.ai/iperchat.iife.js';
});

add_filter('iperchat_demo_url', function() {
  return 'https://demo-staging.iperchat.ai';
});

add_filter('iperchat_api_url', function() {
  return 'https://api-staging.iperchat.ai';
});